
Last Updated on December 1, 2021 by Nadim Alamuddin
| This post is an update of my post dated October 15, 2018. Why is it being updated? Well, WordPress released its version 5.0, which made Gutenberg, now also known as WordPress Block Editor, as the standard editor. These changes should be reflected in my post to allow you to understand the impacts and how you can continue writing blog posts successfully. Any new sections or sentences as a result of the update will be in Italics. Of course, I may have to take out some information that is no longer applicable. |
Congratulations on setting up your new blog! Now that your site is ready, it’s time to write your very first epic blog post. Please note that you can write blog posts even if your site is not “live” yet. WordPress allows you to do so and you can see a preview of your post, regardless of whether your blog is online or not.
Table of Contents
Guten-who?
Prior to WordPress 5.0, you would write your blog posts and pages inside WordPress’ TinyMCE editor, which is the WYSIWYG (What You See Is What You Get) editor I’m still using. In comes Gutenberg, the new WordPress editor that has replaced the TinyMCE editor. Gutenberg is now also known as the WordPress Block Editor.
The Gutenberg Block Editor has been released when WordPress 5.0 came out, on December 6, 2018, according to this site.
How Do We Access Gutenberg?
The Block Editor is activated on your blog automatically if you’re on WordPress 5.0 and beyond. You still have the option of installing the Classic Editor plugin, if you prefer using the old editor until you’re comfortable with the Block Editor. I still use the Classic Editor, mainly because my old posts were created on it and I am reluctant to change.
Before We Begin, Some Instructions…
Confession time! I must have changed the post title over 5 times and finally settled on the current title. However, I will still cover how to create your first blog post using the current WordPress editor, TinyMCE. At the time of initially publishing this post, the Gutenberg WordPress Editor was not released, which is why it’s important that I still cover the classic editor, especially for my readers who are beginning their blogging journey. So, forgive me for a title that is only for Gutenberg, while the post covers a lot more!
So, for those wishing to go through the baby steps, please continue reading. For those who would like to go straight through to Gutenberg, please click here.
The War of The WordPress Editors…
Regardless of which editor you use, you will end up with a blog post. Some people don’t like to write their blog content in the WordPress editors, regardless of whether it’s TinyMCE or Gutenberg. Instead, they write the content in MS Word or Google Docs and when done, copy / paste it into the WordPress editor. It’s really up to you – you can experiment and see which one would be your preference. I usually write my posts directly in TinyMCE. However, in a couple of cases, I’ve found it easier to use MS Word. One such case is when I want to use 2 or more levels of bullets. I do those in Word, and copy/paste them into the editor.
This post is concentrated on the differences in using each of the WordPress Editors:
- Tiny MCE also known as the Classic Editor
- Gutenberg also known as the Block Editor
In order to make your blog post epic, or awesome, please read this post. It covers 5 Simple Ways To Create An Awesome Blog Post.
Creating Your First Epic Blog Post – Adding A New Post
In the next sections of this post, I will take you through step by step instructions with screenshots so it’s clear in plain English what you need to do.
Login to your blog’s Admin area, until you’re in the WordPress Dashboard. Your screen should look similar to mine below, but not quite, as you probably have a different theme activated, different plugins, etc.
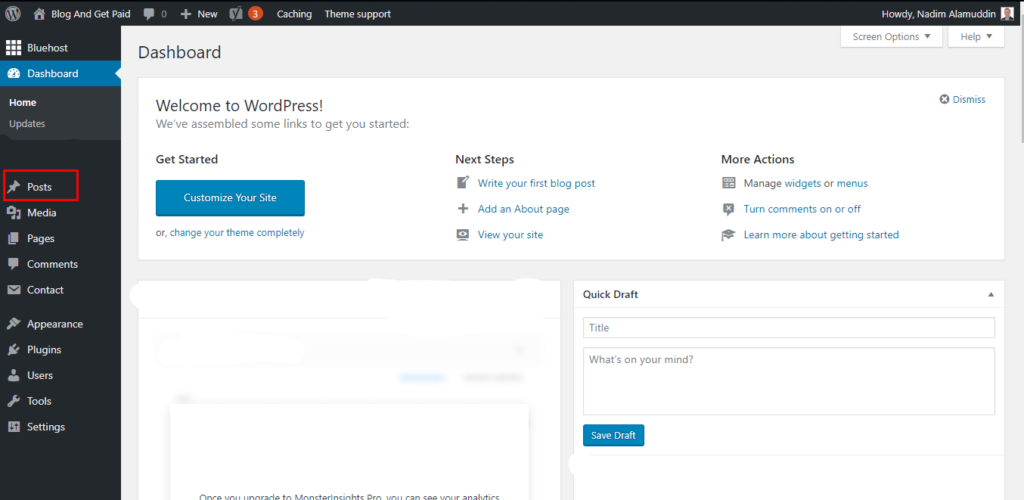
Once in the dashboard, go to the Posts menu on the left, click and select Add New Post from its sub-menu, as shown below:

The following screenshot shows how the current WordPress TinyMCE Editor looks like on the left hand side and how Gutenberg looks on the right hand side. To do this, I have “cheated”; let me explain. The left side is on my website that is “live” and thus with TinyMCE. The right side is a screenshot of my test website that hasn’t been published yet. This is where I have added the Gutenberg plugin, installed and activated it.
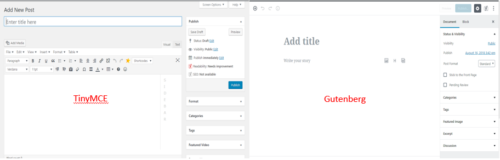
At first sight, the Gutenberg version seems cleaner and simpler. Wait, where did all the formatting buttons go? Before we dive into Gutenberg, I will cover the current editor in details. For each editor, I will go in a lot more details about functionality, how you can create your very first awesome blog and what additional features Gutenberg will have so that it had to replace the current editor.
The WordPress TinyMCE (Classic) Editor:
[Update] After December 7, 2018, if you want to use the TinyMCE (Classic) Editor, you will need to get the Classic Editor plugin, install and activate it.
So, let’s dive into the current WordPress TinyMCE Editor, which, after a couple of paragraphs may look like this:
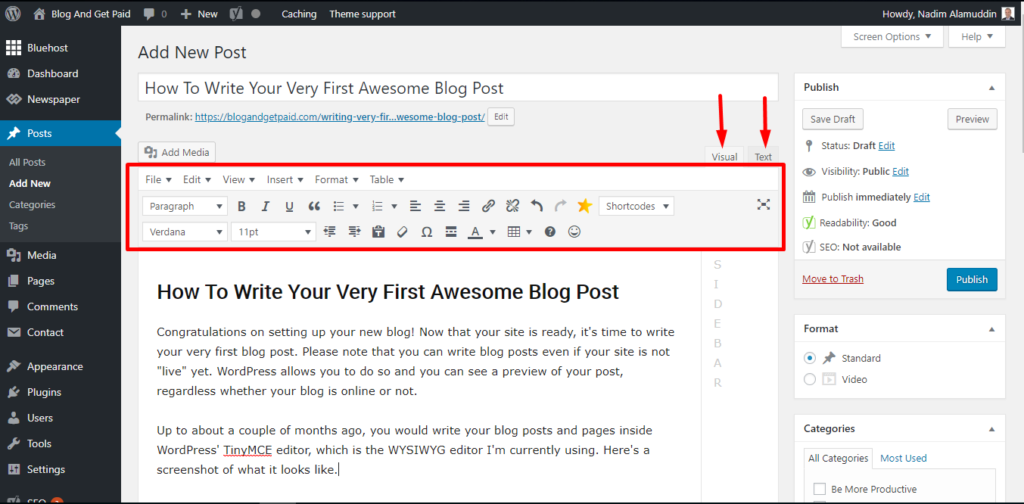
The highlighted rectangle above shows the formatting options, like those found in MS Word or Google Docs. The above image is the “Visual” representation, which is “What You See Is What You Get (WYSIWYG)”. For more experienced users, who know a bit of HTML, you can click on the Text tab (second arrow above to the right), and you’ll get something that looks like this:

You have more flexibility to design your site as you want using the Text Editor than with the visual editor. There are a lot of features to improve the blog that just aren’t possible with the visual editor.
TinyMCE (Classic) Editor: Some Of The Standard Features
Let’s dive into the Visual Editor – here it is again:

The menu and the icons operate like those found in MS Word or Google Docs. Your screen may be slightly different than mine. It depends on the plugins that have been activated. For example, I use a nifty plugin called “Pretty Links”, which allows me to shorten or change the links I use on my blog. In turn, the plugin inserts the yellow star you see in the icon toolbar above, to the left of “Shortcodes”. Similarly, if you have a YouTube plugin, it may appear to the right of the “Add Media” button. (By the way, the “Shortcodes” drop down list is another icon that is the result of a plugin).
Most of the icons are pretty standard and you can get a label description of what they are by hovering your mouse over each.
The Paragraph and Fonts drop down lists are also standard and relate to Styles and Fonts respectively in MS Word or Google Docs. The difference is that they are influenced by the theme and/or plugins you activate on your site. Depending on what you use, you may be able to “default” the style and font used on your blog.
TinyMCE (Classic) Editor: Adding Media (Images, Video, etc.)
The Add Media button is similar to “Insert Picture” in MS Word. It allows you to upload files, such as images, documents and/or videos to the server and then insert them into your blog posts. Within this feature, you can edit your images, align them properly within the blog post, put captions, descriptions, etc.
Under Paragraph, you can format different sections of your blog. There are different Heading styles and paragraph styles. Choose whatever font appeals to you for your blog / blog posts.
TinyMCE (Classic) Editor: Some Unique Icons Within WordPress
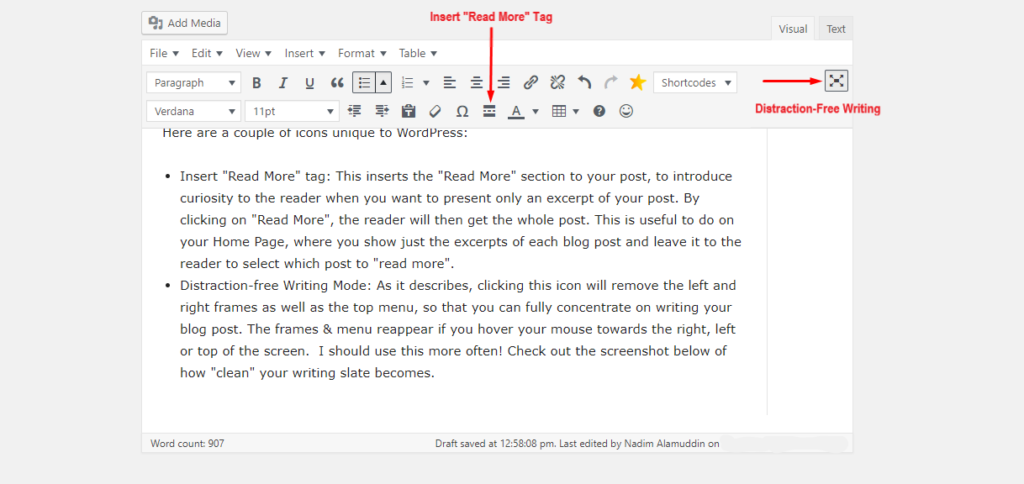
Here are a couple of icons unique to WordPress:
- Insert “Read More” tag: This inserts the “Read More” section to your post, to introduce curiosity to the reader when you want to present only an excerpt of your post. By clicking on “Read More”, the reader will then get the whole post. This is useful to do on your Home Page, where you show just the excerpts of each blog post and leave it to the reader to select which post to “read more”.
- Distraction-free Writing Mode: As it describes, clicking this icon will remove the left and right frames as well as the top menu, so that you can fully concentrate on writing your blog post. The frames & menu reappear if you hover your mouse towards the right, left or top of the screen. I should use this more often! Check out the screenshot below of how “clean” your writing slate becomes.
Saving Your Post
As you write your post, it is often saved by your hosting service provider, but you can also save a draft yourself. You can preview your post as and when required. It is recommended to assign one or two categories to your blog post and one or more tags, to help your readers quickly find posts by specific topic. Once you’re happy with what you wrote, inserted a few images, categories and tags, you can click on Publish. Clicking on Publish will make your blog post appear as the most recent post, whether your site is live or not. If your site is live, anyone typing its URL will get to read it, or find it by Googling it, if it ranks high on SEO. If your site is not live yet, only you have access to it through the Admin dashboard of WordPress.
Related Post: Top 11 Helpful Actions To Take After Publishing Your New Blog Post
TinyMCE (Classic) Editor: Recap
As you may have guessed, the current editor is a basic tool to write and edit your posts and publish them very simply. To be able to do advanced functions with your post, like landing pages, inserting Page Jumps or changing colors based on certain criteria, you’d have to either install and activate some plugins or rely on a particular theme that would do all this. Some of these more advanced functions can be done in HTML coding. We will see in the next few sections, how Gutenberg is going to help in this regard.
The Gutenberg WordPress Block Editor
As you may imagine, Gutenberg is not just a revamped TinyMCE editor. It’s going to be a whole lot more. What WordPress plans to do with Gutenberg is nothing short of it becoming a full fledged publishing application. Of course, WordPress may not release the whole tamale right away and will probably first concentrate on perfecting its editor before releasing new functionality.
Without further ado, let’s explore what Gutenberg can do today. As and when Gutenberg gets released, I’ll be updating this post contents so they’re always accurate and provide you the most value.
| Affiliate Disclosure: This blog post contains links that take you to external sites. Some of these sites are products and services that I recommend, based on my experience with them. If you decide to purchase from them, I may earn a small commission, at no additional cost to you. Thank you in advance for your understanding. For more info, check out the Affiliate Disclosure. |
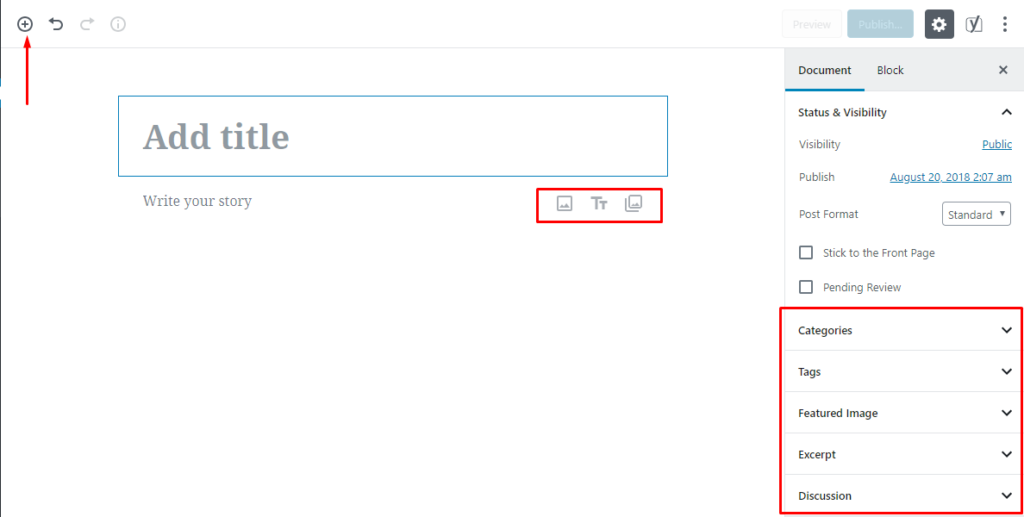
Gutenberg Block Editor: Adding A New Post
Here’s the “Add New Post” screenshot again, with a couple of highlights on it:
First of all, the Gutenberg concept is based on “blocks”. A block can be anything, such as an image, text, an embed, a widget, a button like a call to action, etc. By having flexibility in blocks, Gutenberg can already be more powerful in functionality than TinyMCE. Think of Gutenberg as “block-based” whereas TinyMCE is “text-based.”
I have experienced a similar concept with GetResponse, an email marketing tool that I have used extensively (and highly recommend it). When you build your emails in GetResponse, you do so in blocks. You can easily add or remove blocks and your mails become so much easier to edit.
Gutenberg Block Editor: New Kid On The Block
On the top left hand side of the above screen, the plus sign allows you to add a block. When you click it, a box opens to let you choose the type of block you require. The screenshot below shows what types of blocks show up when you click to Add Block (+) icon.
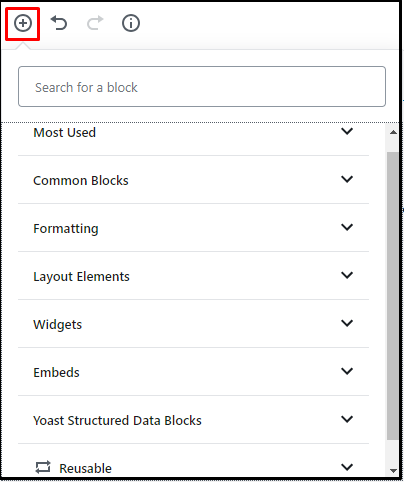
As you can see from the screen above, the blocks are categorized into different groups. The most used blocks get copied to the top category, so they’re available for you to use.
Common blocks include paragraphs, images, headings, lists, quotes, etc. Layout elements include buttons, page breaks, columns, etc. Widgets include latest posts, categories, archives, etc.
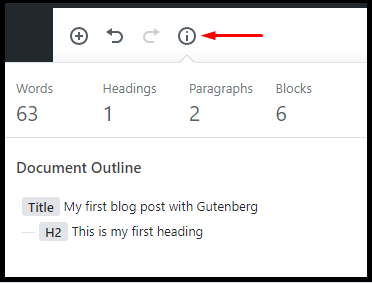
Next to it is the undo button, followed by the redo button, and finally the information button. The information button provides an overview of the whole document in Gutenberg, including where you have used headings, bullets or any of the many elements available.
Unlike the TinyMCE Classic Editor, where you have the whole formatting toolbar visible, Gutenberg is context-sensitive. This means that the formatting toolbar appears whenever you click on a block. Depending on the nature of the block, a different toolbar / menu may appear. Here are some examples:
Gutenberg Block Editor Selection: Blog Title

As you can see above, when the Blog Title is selected, its permalink is displayed as information (and can be edited).
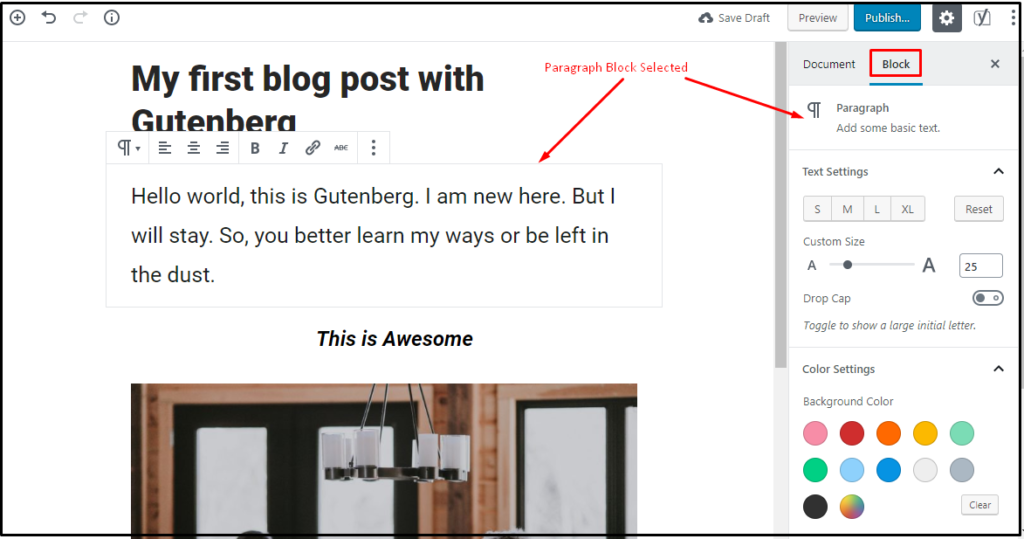
Gutenberg Block Editor Selection: Body Text / Paragraph
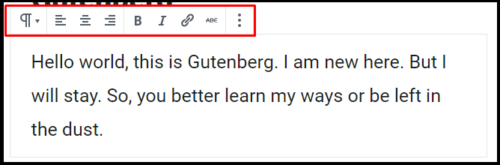
As in the image above, when selecting a paragraph, the menu changes to formatting. The three dots at the right indicate more selections if you click the icon. We’ll cover their options later.
Gutenberg Block Editor Selection: Image

When an image is selected, its own menu appears. Notice that the left-most icon features the image.
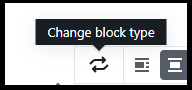
There is an arrow at its right and, as you hover over it, it turns into two revolving arrows pointing to each other. If you click on the icon, you get another menu, where you can change some features of the image. This is shown below.
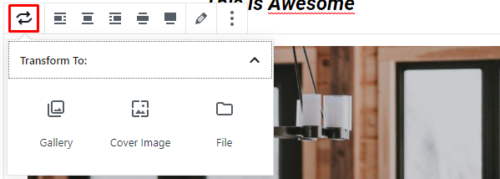
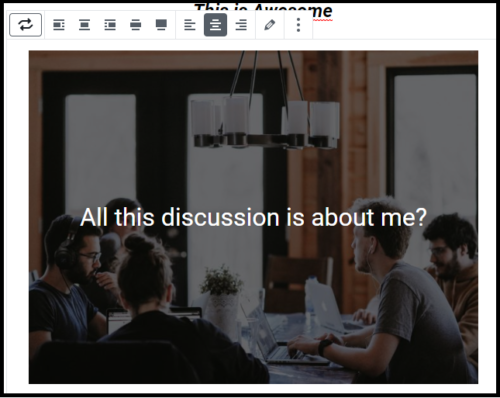
Let’s try to change the image type to a Cover Image. Look at the result…all at the click of a button! So, the caption is now in the image! And the image is darker.
By the same token, you can choose Gallery, and the caption will be added inside the image, but at the bottom. And then, you get the option of uploading another image (and another), to form a gallery.
Gutenberg Block Editor Flexibility
Remember I said we’ll look into the three-dotted icon? Here’s a look at what the menu holds.
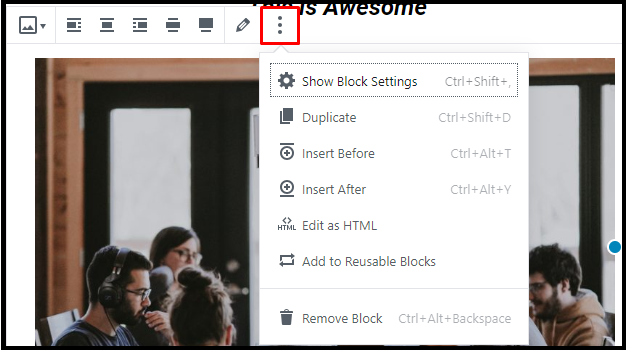
As you can see from the options menu, you can duplicate (copy) a block, you can insert it before or after another block. You can also Edit as HTML, which is like the Text feature that was in TinyMCE. If you’re comfortable with HTML, you can add your own code to the block.
Do you notice the option “Add to Reusable Blocks”? This is a powerful feature. Think of a “Reusable Block” as a template. You can format a block to your liking and save it as a Reusable Block. This way, you can reuse it in the post or other posts or other pages, saving you lots of time editing your work. To insert a reusable block, click the + sign to add a block, and scroll to the bottom of the block types. It will be found under Reusable Blocks.
Of course, if you don’t like the block at all, and you don’t want to change its type, you can always delete it by selecting the last option – remove block.
The top option on this menu is the settings, which opens the right hand side menu. This is the same as clicking the gear icon at the top right of the page.
Gutenberg Block Editor: What Else Is There On The Right?
We briefly touched on the right side menu. To access it, you can either click on the Options menu from within a selected block and the select Block Options, or Click the Gear Icon from the top right side of the page.
This menu is also somewhat context-sensitive. Some options within it vary according to where you click on the page. There are two tabs in this menu: Document and Block. Within the Document tab, you will find all options that you can set that pertain to the blog post as a whole. The Block menu has additional options for the selected block. They are additional to the toolbar that appears at the top of the selected block.
You will find the Document options familiar, if you’ve been blogging on WordPress for a while. They are the same options that you find using the TinyMCE Classic editor. Also, if you install and activate plugins, these will have their own settings or features either in the right side menu or at the bottom of the post.
Here’s a screenshot of the Block Additional Options for a selected paragraph block:
So, What Happens When WP 5.0 Is Out?
Well, glad you asked that. Depending on who is hosting your site, your WordPress installation may be automatically updated. I know that Bluehost will be automatically updating WP for their customers. In the next WordPress update, Gutenberg will become the editor by default.
When I went into my WordPress Admin area, I found out that my version of WordPress is now on 5.0 and that I needed to update a few of my plugins to be compatible with 5.0. And, because I had installed the Classic Editor plugin already, all my posts now can be edited either using the Classic Editor or with the Block Editor. Even if I choose to create a new post, it’s doing so in the Classic mode, since my Classic Editor plugin is active.
Impacts of WordPress 5.0 With Gutenberg
However, do not panic! Gutenberg will not affect what your customers & readers will see. What Gutenberg will change is the WordPress Editor, which is what you use to edit your posts.
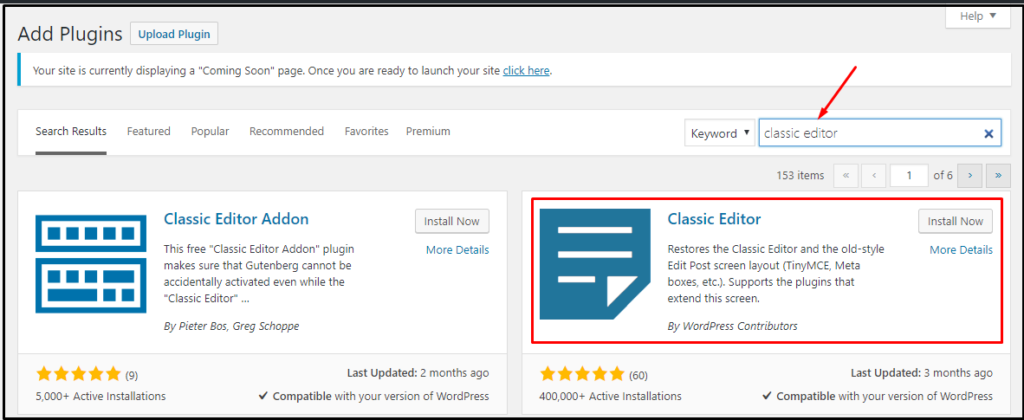
If you do not want to use Gutenberg Block Editor right away, you still have the option to stay on TinyMCE. To do so, go to your WordPress Dashboard, go to Plugins and Add New. Type “Classic Editor” in the search bar.
Timing Is Everything!
If you’re just starting out with blogging, I would recommend you to embark on the editing journey with the Block Editor.
If, however, you’ve been using the Classic Editor then you may want some practice on the Block Editor before using it on your live site. In that case, I recommend that you install and activate the “Gutenberg plugin” on a test site and experiment with it. If your test site is already on WordPress 5.0 or above, you just need to create a new post and you’ll be on the Block Editor automatically.
Ideally, load your current theme, with all your current plugins into the test site to ensure that Gutenberg does not have any conflicts. The more you test the more confidence you’ll be blogging on Gutenberg. Once you’re ready, you can start blogging with confidence with the block editor on your live site.
In Summary…
Phew, this was a long one! But, I hope you have gained some insights for the options you have in WordPress Editors. You’re now well on your way to write some super duper blog posts, whether using the TinyMCE Classic or Gutenberg Block Editor. If you enjoy reading detailed posts, here are three of my favorites:
- From Zero To Blog In 5 Steps
- Top 10 Amazing WordPress Plugins For Your New Blog
- From Zero To Theme In 30 Minutes
- From Zero To WordPress Dashboard: A Beginner’s Guide
Some mindset posts for your reading pleasure:
- 7 Keys You Need To Overcome Your Struggles
- Top 13 Reasons Why People Reject Opportunity
- Revealed: 7 Secrets To Better Time Management For Entrepreneurs
If you haven’t done so already, check my About page. Please leave me some feedback at the bottom of this post. Let me know what you liked or disliked about this post. If you have any questions or concerns about Gutenberg, I’ll be glad to reply.

Thanks for making Gutenberg sound simple and accessible. You have managed to remove the “overwhelm” factor by explaining how it’s going to work in plain accessible English. Now, I have nothing to worry about when it gets released! You have actually saved me time by doing the research yourself! We all know that time IS money 😉 Thank you.
Hi May,
Thank you for your valuable feedback. I agree with you that when I first heard about Gutenberg WordPress Editor, it scared me, especially about how I’m going to deal with it on my future blog posts, while I have a day job 🙂 – But, as I installed & activated the plugin and started to work with it offline, it became clear to me its advantages over the current TinyMCE editor. And I’m not into HTML. I’m sure Gutenberg is going to be a great addition to the WordPress platform.
Again, thanks again for your comments, and thanks for being a loyal reader!
What an incredibly informative and insightful read! Honestly, I haven’t been sold on the new Gutenberg block editor just yet. I still have the classic editor installed as a plug-in. But your post has gotten me excited about block editing, especially since I’ve been reading a lot about its new and more powerful and versatile features. I’ll definitely consider it soon. Thank you.
Hey Jared,
Thank you so much for your comments. I have a confession – up to about 6 weeks ago, I also was using only the Classic editor, as I found it a lot easier than the Block Editor. But, now that I “forced myself” to use the Block Editor, I’m learning it as I go and it does have some nice features. One thing it can do is turn your old Classic posts into Blocks so you can apply all the features of blocks to them. One of the nicest features in Blocks is the ability to save a block of text that you often use, such as the “Affiliate Disclosure” text.
Anyway, glad to see I’ve added value to you…