Last Updated on March 16, 2021 by Nadim Alamuddin
So you’ve made the decision to start a blog! Congratulations! Creating a blog is a relatively easy process. I am going to show you how you can go from Zero To Blog in 5 simple steps. Going from zero to blog means starting from scratch, from a clean slate.
What I need from you, my reader, is to make absolutely sure to switch off all distractions and give me your undivided attention for about 45 minutes. That’s how quickly we can setup your blog! I also want you to follow exactly what I tell you to do.
| Affiliate Disclosure: This blog post contains links that take you to external sites. Some of these sites are products and services that I recommend, based on my experience with them. If you decide to purchase from them, I may earn a small commission, at no additional cost to you. Thank you in advance for your understanding. For more info, check out the Affiliate Disclosure. |
Table of Contents
You can create a blog with a couple of options…
Before we start, I thought I’d give you two options to choose from:
Option 1: The Quick & Dirty Way of Creating A Blog: If you’re eager to start right away, you can jump to this section, which will just instruct you what to do. Follow the instructions and links, and you’re up and running in no time.
Option 2: Going From Zero To Blog in 5 Easy-To-Follow Steps: This section is a step by step detailed guide so that you can make an informed decision at each stage. This is my recommended approach, especially if you want to create your blog right from the first time.
Note: No matter what option you choose, you can always change some choices you’ve made. It’s just that the odds are high in the first option that you may end up spending a bit more time later in fine-tuning your blog.
Option 1: The Quick & Dirty Way of Creating A Blog
We’ll do this option in 3 steps:
- Get a web hosting account with a domain name
- Install WordPress as your blogging platform
- Choose and activate an appropriate theme for your blog
1. Get A Web Hosting Account With A Domain Name
Go to Bluehost.com and create a Web Hosting account. Through the web hosting account, you can register a free domain if you don’t have one already, or just plug in your domain name, if you do.
When you click the above link, you’ll get the following screen. Click the green “Get Started Now” button and then choose the most appropriate option (I would recommend you choose the option that allows hosting on more than one site).

Click Select to proceed to the following screen, where you can either enter your existing domain name (right box) or create a new domain (left box – red arrows below).
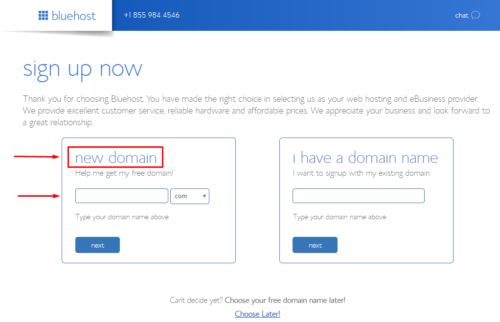
Enter a domain name for the type of blog you want to create. If you know what you’ll be blogging about, choose an appropriate name for the blog, to be consistent. Alternately, you may want to create a domain name as a brand or with your name in it.
Registering Your Domain Name…
Whichever name you choose, enter it in the left box and click on “next”. If the name you chose is already registered, you will get an error message and you’ll have to choose another name. Otherwise, you’ll be taken into another screen to fill your name, address and payment information.
You’ll also be presented with package options. I recommend you do not add any option at this stage – all are add-ons that you can purchase at a later time, when you read up on them.
Money Saving Tip: If you move your mouse up the page (as if you’re about to leave the site), you may get a popup from Bluehost to save more money!
Once you have filled all information, read the terms & conditions, cancellation policy and privacy policy, acknowledge this by clicking the check box and clicking the green “Submit” button. This will create your domain and your Bluehost account and will land you on the Bluehost login page where you can now create your password.
Create your password, read the privacy policy and terms & conditions, tick the check box and click on “next”, where you’ll get a “Congratulations” box acknowledging that you have successfully created a password.
You will now receive an email welcoming you to Bluehost with your login credentials.
2. Install WordPress as your blogging platform
Now that you have registered a domain and have hosting for it, it’s time to install WordPress, your blogging platform.
To do so, login to your Bluehost account, using the login credentials you just created. If you are still logged in, you will immediately be taken to the Control Panel, abbreviated cPanel, where you can click on “WordPress” so that it installs in one click. Click “Install”.
If you had to login again, and you select the one-click install for WordPress, you will be asked to select the domain for which you want to install WordPress from a drop down list, and click on “next”. Here, you will name your site, input your username and password. Click “Install”.
As WordPress installs, you can browse through WordPress Themes (see next section).
3. Choose and activate an appropriate theme for your blog
Once the installation is complete, you will get the following “Installation Complete” message with a link. Click the highlighted link to login to the WordPress Dashboard.

You will now be presented with your site login credentials, as follows:
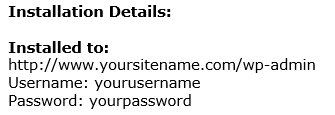
Login to your WordPress by entering the above credentials at your site’s “wp-admin” URL. The first screen you come to is called the WordPress Dashboard. This is described in more detail in the sections below.
Choose Your Theme…
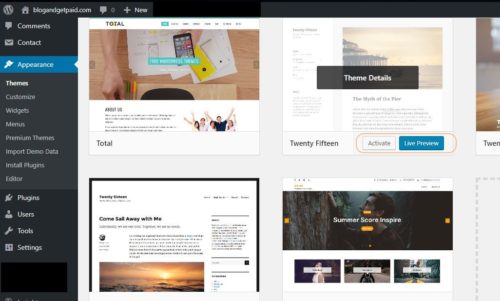
As we’re still creating the blog in a quick & dirty way, go to the menu Appearance and select Themes. This will take you to the Themes marketplace, where you can choose how your blog is going to look like.
You can easily spend hours if not days on this, especially if you’re a perfectionist! For the sake of this section, we’re going to select one Theme from the list, preview it and activate it.
As shown below, select a Theme by clicking on Live Preview. This will show you your current blog with dummy written sections and images, to give you an idea of how headers, footers, headings, paragraphs and other formatting would look like if you choose this theme.
If you like what you see, click Activate and the selected theme will become the new theme for your blog!
Congratulations! You have gone from zero to blog and now have your own WordPress blog, hosted on Bluehost, with a smashing theme, ready to receive its first blog post.
This concludes the “Quick & Dirty Way Of Creating A Blog”. If you need more details to any section, please continue reading. I will also write posts on how to write your first post, and other blog-related material.
Option 2: Going From Zero To Blog in 5 Easy-To-Follow Steps
Step 1: Choose Your Niche
Remember when I said to go from zero to blog means to start from scratch? Well, your first step is to choose what you want to blog about, your niche.
There are different schools of thought when it comes to selecting your niche. Some people advise to choose and stick to a niche you may be an expert on or be passionate about. Others tell you it doesn’t really matter what you blog about, as long as it brings value to your readers, or it solves their problems. You are the one who will know best how to tackle this question. I would recommend you start with one to two topics and later, if necessary, expand on more.
What you eventually choose may influence the next step – choosing a domain name for your site.
If you’re not sure yet what you want to blog about, or want to read in more details how to select your niche, please read my post on “From Zero To Niche In 30 Minutes“.
Step 2: Choose a Domain Name for Your Site
The domain name is the web address that people will type to get to your blog. To register a domain, you must go to one of the registrars sites, such as Godaddy or Namecheap. Both are well established on the market and offer solid support. Alternately, you can register for a domain name at the same time that you’re opening a Bluehost web hosting account, since the domain name comes for free with a Bluehost account.
So how do you choose a domain name? Suppose you have decided on a particular niche, as discussed in Step 1 above, you can try and find catchy domain names around that niche. Alas, you will run into challenges where whatever name you try is already taken. But, with perseverance, you will be able to choose an appropriate name.
But, what if you don’t want to limit yourself to a particular niche? Here, you can go for something totally off the wall, something catchy, something that will brand you. Think of Nike, Google, YouTube – they all invented catchy meaningless words that became their brands!
Alternately, you can brand yourself, by registering “yourname.com” or something like “workwithname.com”. You get the idea!
When you go to Godaddy or Namecheap, you’ll also wonder which extension may be more suitable to choose for your site – .com, .net, etc. I recommend you stick with the .com convention as it’s easier to remember and seems to be the norm. However, if you want more details, I recommend reading this blog post, which provides you the pros and cons of choosing .com vs. .net extensions.
For a more detailed look at how to choose a domain name, read my post “From Zero To Domain Name In 30 Minutes“.
Step 3: Choose Your Blogging Platform
So, if you’re just starting out, chances are that you don’t have a lot of money to invest up front. What better way to start creating a blog than on a free blogging platform? WordPress.org is a free blogging platform that is flexible and relatively easy to use. Of course, other blogging platforms exist, such as Wix, Blogger, Tumblr, Weebly, etc.
I recommend using WordPress.org as your blogging platform, due to its easy adoption, limited coding requirements, and overall flexibility. But, you don’t have to take my word for it. Here’s a detailed look and comparison blog post written in plain English.
Step 4: Choose Your Web Hosting Account
Think of web hosting as the service that puts your domain online. Without it, your domain will not be accessible on the internet. So, you need both a registered domain and a web hosting service.
Some web hosting service providers have offers including a free domain registration for the first year. Bluehost is such a hosting provider and offers web hosting for as little as $3.95 per month, which is very competitive.
There are other web hosting providers with different offers and specifications. Hostgator is yet another such provider. While I have domains hosted on both Hostgator and Bluehost, I prefer Bluehost, especially for the non-technical beginner blogger. Once you sign up, you follow their setup wizard and it helps you setup your blog in no time. I also have had great support from Bluehost – especially on chat.
When you sign up with HostGator, you get into the account and have to navigate through their dashboard (called Control Panel or cPanel for short) to get to install WordPress. I had some challenges mapping my domain onto HostGator.
I lost a few days on support between HostGator and Godaddy to finally figure out the issue. Again, that was my experience, where with Bluehost, it was all done seamlessly in the setup process. I just wanted to add that, even though I had a rough start on HostGator, their support was top-notch!
There are other web hosting providers, but, as I stated above, I’d still recommend Bluehost.
Step 5: Install WordPress And Choose Your Theme
If you have heeded my advice and chosen Bluehost, by now you would have installed WordPress as part of the setup process.
Login to your hosting account, go to the cPanel (dashboard), find the WordPress icon and click on it to Install. It’s probably labeled “One-Click Install”.

Once WordPress is installed, you’ll get to the Dashboard where you will find a welcome message and some notifications. Please note that the dashboard may look differently depending on the theme selected. On the left side of the screen, you will find the WordPress menu.

Go to “Appearance / Themes” to select the theme (or layout) for your blog. You can do a “Live Preview” on each theme to see the various formatting styles before activating the theme. There are over 42,000 free WordPress themes to choose from and many more paid themes. For step by step instructions on choosing a theme, please read “From Zero To Theme in 30 Minutes.“
Depending on the type of person / blogger you are, you can spend quite some time here. To stick to our timetable (creating a blog in 45 minutes), let’s just choose a theme and activate it. You can always go back and change it if it doesn’t work for you.
You’ve Done It!
And, voilà! You created your own blog in 5 Steps in 45 minutes (if you didn’t spend too long per step).
For a more detailed look at each section, please read up on the following detailed posts below:
- From Zero To Niche In 30 Minutes: This post walks you step by step on how to choose your niche to blog in.
- From Zero To Domain Name in 30 Minutes: This post walks you through the steps to choose a domain and register it.
- How To Choose The Best Blogging Platform: This is an external post that shows you how to choose what to blog on, as there are many blogging platforms, such as WordPress. I have another post which highlights other platforms.
- From Zero To Theme in 30 Minutes: This post guides you on how to choose your blogging theme and the pros & cons of free vs. premium themes.
- Best 7 Strategies To Increase Organic Search Traffic: This is an introduction of what Search Engine Optimization (SEO) is, and how you can use it to rank your posts on search engines.
A Favor To Ask You…
I would love to see the fruits of your labor. If you’ve setup your own blog, would you mind sharing it with us? You can do so in either of the following ways:
- Leave a comment below with your lessons learned setting up your blog. You can also leave me any questions you may have. In the website field, you can put the URL of your blog. This, by the way, is a way to get backlinks to your blog.
- Use the Contact Form to send me your link to your blog.
If you haven’t done already, check out my About page.
Conclusion:
Congratulations! By now, you should have been able to:
- Choose a niche to blog about
- Choose a name for your domain, and register it
- Create a hosting account
- Install WordPress and choose an appropriate theme
I have written a post on From Zero To WordPress Dashboard: A Beginner’s Guide, which effectively guides you on how to login to the WordPress admin area and find your way around before writing your first blog post. Check it out.
Next, you’d want to create your very first post and may want some instructions. Please read this post. And, if you want to add functionality (called plugins) to your blog, read “Top 10 Amazing WordPress Plugins For Your New Blog.”
If you’re wondering how to make money with your blog, check out “Best 3 Simple Ways To Monetize Your New Blog“. Another way to monetize your blog is by setting your website as an online store. If this tickles your fancy, read “Before Setting Up Your WooCommerce Store Incorrectly, Check Out These Five Lessons Learned“, for an in-depth look at what you need to be weary of, when setting up your online store.
Thanks a lot for your visit and for making it this far! If you have ANY questions, please leave me a comment below or send me a private message by using the Contact menu. It would be my pleasure to address any and all your questions.
Featured Image courtesy of Rawpixel