
Last Updated on March 9, 2024 by Nadim Alamuddin
This blog post guides beginners to understand and setup the admin area of WordPress, called the Dashboard, before they start blogging. This is what is meant by going From Zero To WordPress Dashboard. If you google “how to create a blog”, you would normally land on blog posts describing the steps leading to installing WordPress, but very little information is available on understanding what to do, once you’ve done this.
This blog post assumes that you’ve chosen to blog on the WordPress.org platform. Since WordPress powers about 35% of the web, it is the platform of choice for most bloggers. If you have not yet setup your blog, or installed WordPress, please be sure to read From Zero To Blog In 5 Steps.
Update: I wrote this blog post when version 5.5 of WordPress was just released. However, I’m happy to say that the WordPress Dashboard still has the same menus in versions up to the current version, which is 6.4.3.
Table of Contents
Before Accessing Your WordPress Dashboard
Once you create your hosting account and install WordPress, part of the setup process is to register a username and password to get into the Admin area of your WordPress. So, with this information handy, go to the following address:
- https://yourdomainname.com/admin
You will get into a screen similar to the one below:
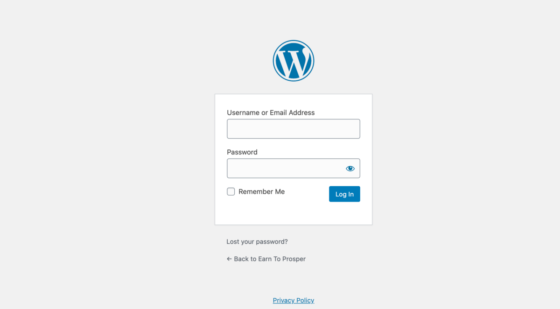
Enter your username or email address that you registered with and your password and click on Login.
Congratulations, you’ve now accessed your WordPress Dashboard! This is really your WordPress Admin area, where every blogger (or website owner) will spend their time writing, formatting and maintaining their site.
Welcome To WordPress!
If this is the first time you access your WordPress Dashboard, you will be greeted by a “Welcome To WordPress” area, such as the following screenshot:
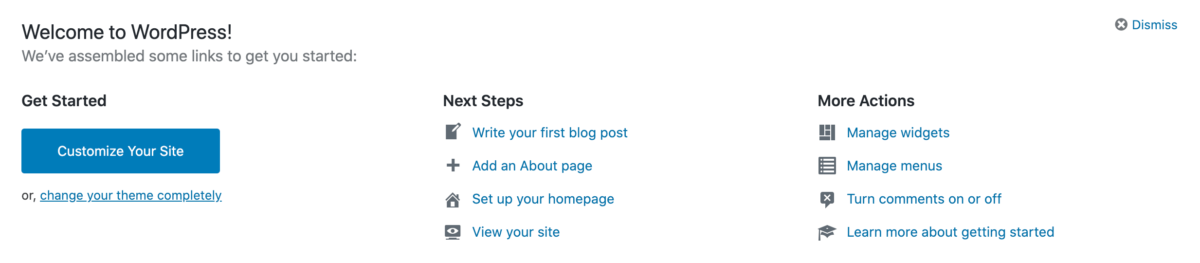
This area is used mainly to give newcomers to WordPress easy access to start setting up WordPress as fast as possible. However, in my opinion, it is best to be patient and do a proper setup of your site before publishing your first post.
In this blog post, I will help you get started correctly and help you understand the features at your fingertips. Before doing so, however, I will explain the different links in the Welcome section.
Get Started
Customize Your Site button: This option will take you to customize the activated theme, if you have one. The area is called the “Theme Panel”.
A theme in WordPress is a feature that allows you to personalize the way your website looks and feels. It allows you to change the page layouts, the fonts, the colors, the menus and the overall design of your site. For WordPress, there are free and premium themes.
For more information about themes, please read “From Zero To Theme In 30 Minutes“.
Change Your Theme link: This option will allow you to look for other themes to install and activate. By default, the selection on the left is on “Installed Themes” and on the right, you will see the active theme (the one you’re currently using, if any) and any other themes that may have been installed with WordPress.
There is another option below the “Installed Themes” which is “WordPress.org Themes”. If you select it, the right screen loads with all kinds of different themes you can “Install & Preview”.
That’s right, what’s great about WordPress is that you can easily install any theme and preview it before activating it. This allows you to check if you like the theme’s design before investing any time formatting it to your site.
Next Steps
Under the Next Steps section, you can:
- Write your first blog post: this takes you to Add New Post to create your first blog post
- Add an About Page: this takes you to create a new page for About to describe what your website is about
- Setup your homepage: this takes you to setup your homepage defaults
- View your site: this allows you to preview what your site currently looks like from the front end (when a visitor lands on it)
More Actions
Under More Actions, there are links to:
- Manage Widgets: this takes you to the Widget area, which are little sections that can be added in the sidebars of your blog, your header or footer areas.
- The sidebar is like a wide margin that can be designed to the left or right side of your blog post content. For example, on this website, I use a right sidebar, where I can put “widgets” for my categories, or related posts.
- The header is the area at the top of your page where the menu usually resides
- The footer is the area at the bottom of your page
- Manage Menus: this links to the menu area, where you can design your menus and sub-menus.
- Turn Comments on or off: this links to the discussion settings, where you can choose whether you want your readers to leave comments or not
- Learn more about getting started: this links you to the WordPress.org blog post to teach you more about how to get started.
Recap on the Welcome To WordPress Area
While the links are helpful, they do skip setup settings that need to be done before publishing your first post. You can “dismiss” this section altogether, by clicking on the “Dismiss” link at the top right of this section.
If you want to display this section again, click on Screen Options (top right of your screen) as per the screenshot below:

Now, click on the “Welcome” checkbox, as follows:

As per the above screenshot, you can see that the “Screen Options” option can be selected to customize which sections to appear on your Dashboard.
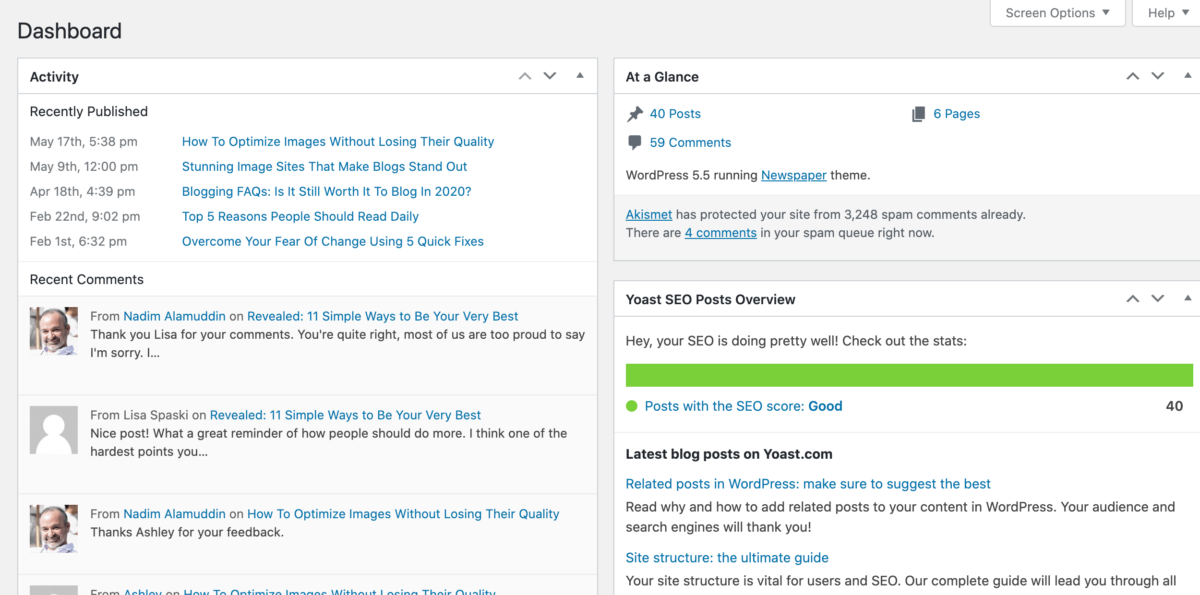
Your WordPress Dashboard At A Glance
The following screenshot shows a typical WordPress dashboard. Yours may be different, depending on how you’ve setup your WordPress, or what plugins (described later) you have used.
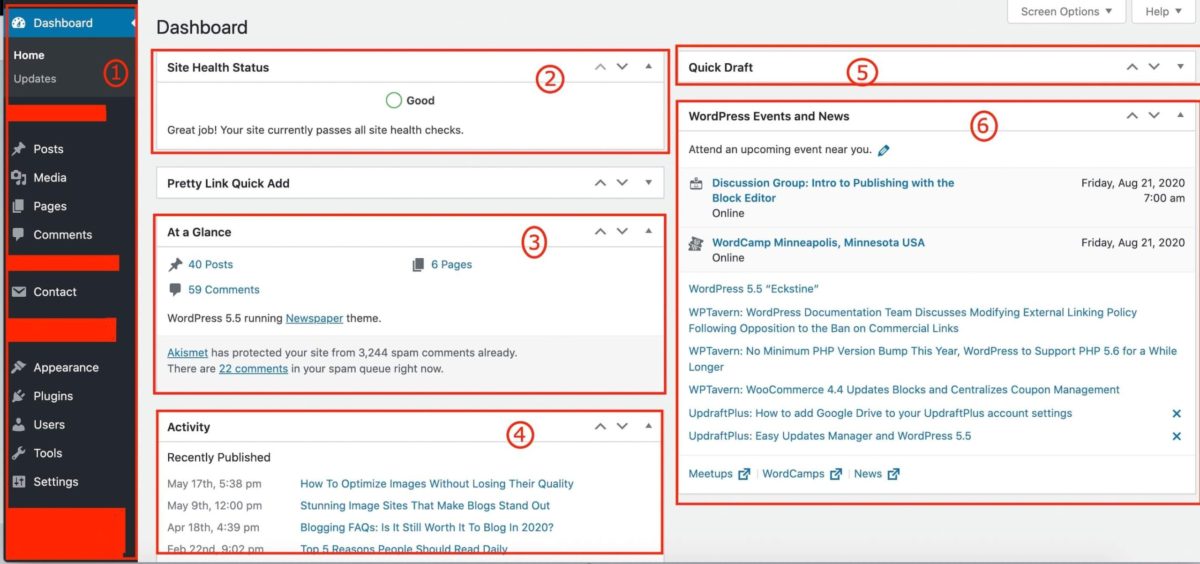
Sections of the WordPress Dashboard
Looking at the WordPress Dashboard, you will find some sections I have highlighted as follow:
Section 1: The Admin Menu
This is the main menu for the admin area of WordPress, or the back office. We will explore it in more details later, in the section “The WordPress Dashboard Menu”.
Section 2: Site Health Status
This is the Site Health Status area. By default, WordPress monitors the health of your site and provides alerts for you if your site needs some attention. When you login the first time or if you’ve been maintaining your site properly, you will have a “Great Job” message.
Sometimes, however, the site health indicator may display that you have a few things that may need fixing. You can click the link here and you’ll be directed to another screen where you’ll see which tests failed and which have passed the health check. Those that have failed would need to be taken care of and would have some suggestions on how to resolve.
Section 3: At A Glance
The “At A Glance” section shows you a tally of the number of posts, pages and comments you have on this site. It gives you information on your WordPress version.
It may provide additional information, depending what plugins you have activated (Plugins are small extra functionality programs that you can add onto your site). In the screenshot, for example, it displays a message about Akismet, a plugin I use (and recommend) to filter out spam messages.
You may have noticed that The posts, pages and Comments are all in blue underlines, meaning they are links and will take you directly to the respective sections within WordPress.
Section 4: Activity
This is the activity section, where your latest actions will be displayed. In this example, the latest posts published on this site are listed, with a link to each.
As we have seen in the Welcome section, you can enable or disable a section by accessing the “Screen Options” section (top right of dashboard).
If you have received comments on your posts, they appear here as well.
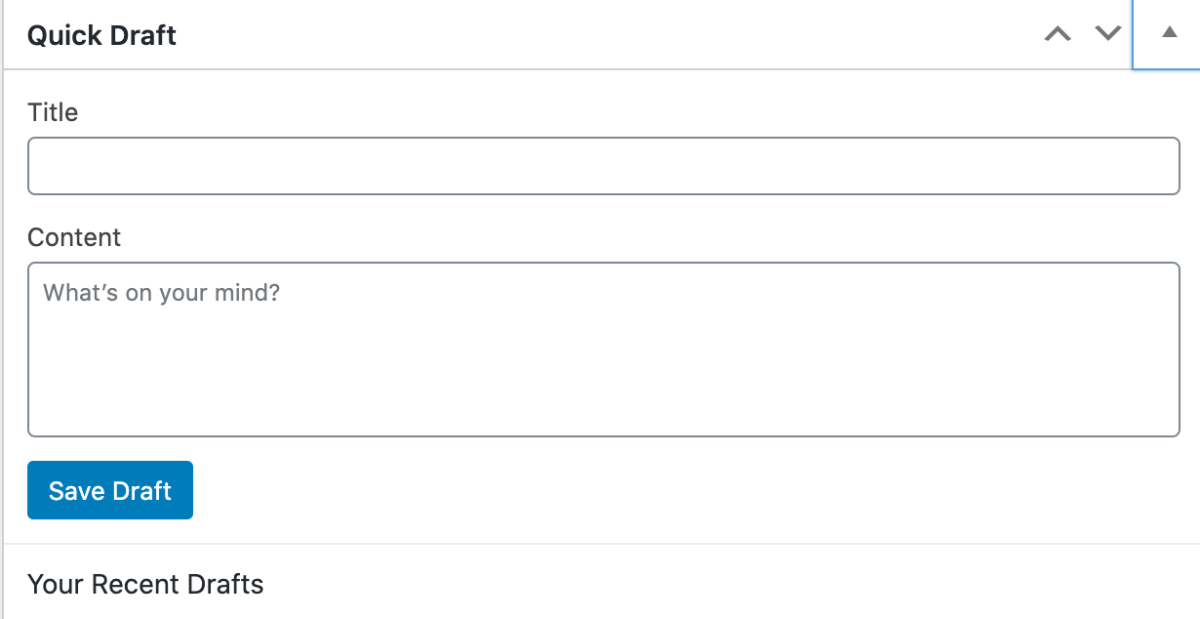
Section 5: Quick Draft
Quick Draft: this section is useful if you’re a blogger that always gets ideas and wants to jot them down before forgetting. It’s a way to start a quick blog post as a draft.
In the screenshot, the section is collapsed. If you expand it, by clicking the tiny arrow at the far right of the section, it would look as follows:
Section 6: WordPress Events & News
Here, you will get a listing of WordPress Events & News from around the world.
Customizing The Sections Within Your Dashboard
As I mentioned above, you can customize which sections to display on your dashboard and in what order.
Screen Options
To choose which sections to display, click on the “Screen Options” in the top right of your screen, as illustrated below:
This displays the selected sections currently displayed in your dashboard. Here’s my selection (yours may be different):

The red squares above are selections based on the activated plugins that I have on my site. You may not have the same ones.
The others have already been explained in the above sections.
Customizing Your Dashboard Layout
You can select your sections and drag them to where you want to display them. For example, let’s say you don’t really want the news to display on the right, but you’d rather have your Yoast SEO (if you have the plugin activated), since SEO is an important feature for websites (SEO, or search engine optimization is how you write your blog posts to ensure they appear on the search engines’ top results pages).
Go to your dashboard, click and drag sections to your heart’s content. Here’s how mine now looks:
When In Doubt, Click On Help!
On the top far right of your dashboard (to the right of the screen options), you can find the Help section. If you click it, this section will open at the top to provide you links on navigation, layout, content, as well as a link to further documentation on the WordPress Dashboard, written on the WordPress.org blog.
Here’s a screenshot of the Help Section

The WordPress Dashboard Menu
The left hand side section of your dashboard is the WordPress menu. First, let’s familiarize you with the main sub-sections and what they represent.
The image below shows the WordPress menu from my website. The red blanked out sections are menu items that pertain to the plugins I have activated on my blog.
Here are the sub-menus:
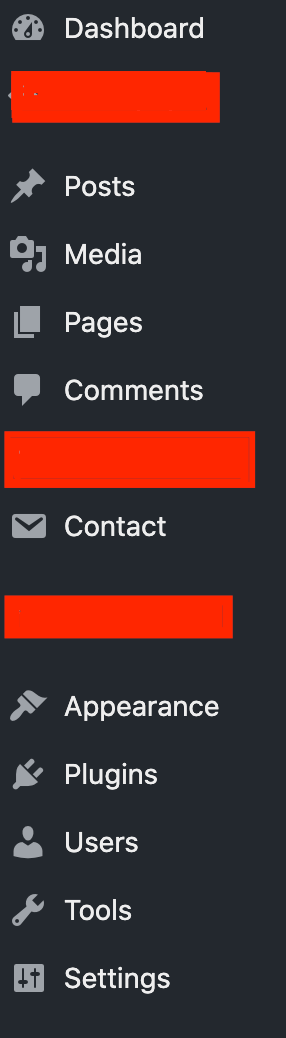
Dashboard: The Dashboard sub-menu is what displays usually when you login to the WordPress admin area. Once you navigate to other menus, you can always access it by pressing Dashboard.
Posts: This submenu is where you can create new posts or edit any already created posts.
Media: This is where you upload your media files (images, videos, documents, etc.).
Pages: Your website may have many pages, such as the homepage, About page, Contact page, etc. This is where you design your pages
Comments: This is where you can manage the comments received by your readers.
Contact: Here you can define how your website visitors can reach you.
Appearance: This is where you can link to customize your theme, your widgets, your menus. You can also link to install plugins and for more advanced users, you can access the theme editor, where your theme can be edited in programming code.
Plugins: This is where you can install and activate new plugins, or customize & update already installed & activated plugins. You can also access the Plugin Editor, if you know programming.
Users
This is the users admin area, where you can manage the users on your website. This is also where you can maintain your admin profile.
Tools
WordPress comes with some standard tools that are available here. Some plugins may also have links to their tools in this menu.
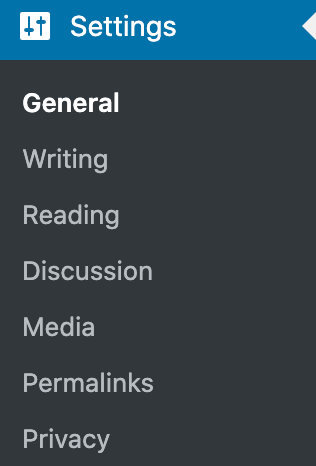
Settings
WordPress comes with a few settings that must be properly setup depending on how you plan on using your website. Some plugins will also add links to their settings here.
Let’s Dive In Deeper Into Key Settings
The Settings submenu is our first stop to setup the basics for your WordPress website.
General Settings: This screen contains key settings for your website. These include your site title, its tagline (a catchy phrase to captivate your visitors), your website URL, your admin email address. There are also preferences like your language, time zone, date and time format, etc.
For the time zone setting, you can set it up to where you are, or where your readers are. For example, I am based in Dubai, but most of my readers are in the US, so my setting reflects the Eastern Standard Time zone.
These are easy to setup and do not need any guidance.
Writing Settings
This screen contains other settings like the Default Post Category. Categories allow you to classify your posts depending on the sub-topic you write about. You can choose the default category that will be selected in case you forget to categorize your post.
You can setup which Editor would be your default editor here. As of WordPress version 5.0, there’s a new Block Editor that can be used. I still use the old “Classic Editor”, which I find easier to use. For more info on this, please read How To Create Your First Epic Blog Post Using Gutenberg (Block Editor).
By default, WordPress alerts some blog services whenever you publish a blog post. These services website addresses can be entered in the section “Update Services”. You can add to these services, if you know of some that are not on the list.
Reading Settings
This option allows you to setup if your homepage should display your latest post or a static page. If you opt for the latter, you may want to design a landing page for your visitors to view before going into your blog posts. The settings here may also be setup within your Theme customization options.
Depending on your website objective, you may want to allow search engines to search your site or not. If you want your site to be visible to search engines, be sure to uncheck the box here.
Discussion Settings
This whole section is dedicated to configuring how you manage your comments. The following screenshot shows the first half of the screen:
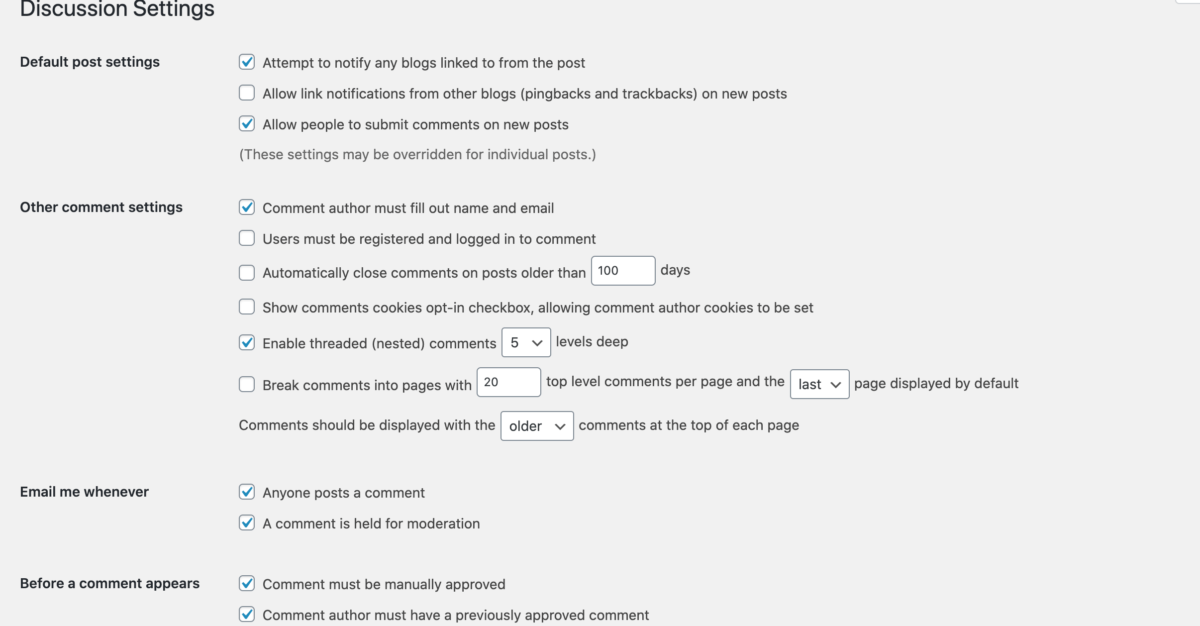
The settings help you configure how users’ comments should be managed. Would you like to be notified by email whenever you have comments, should comments be posted automatically on your site, or would you like to review them first, in case they may negatively impact your site?
If you have a website that allows users to register to access certain areas, you can define whether to allow only registered users to write comments. Most of the settings here are straight forward.
If you scroll down, you can also setup keywords that allow you to filter out comments. Personally, I use a plugin called Akismet that filters out spam brilliantly. I don’t need to manually do all the settings here.
The last sub-section if you scroll further down in the Discussion settings, is the Avatar section. Here you can assign which Avatars to use for visitors who comment on your site but who don’t have any associated avatars (an avatar is a graphical substitute of your own image or picture).
Don’t forget to Save your changes if you’ve changed any settings.
Media Settings
While a lot of website owners leave these settings alone, this is an area that I’d recommend that you do change.
The default settings are as follow:
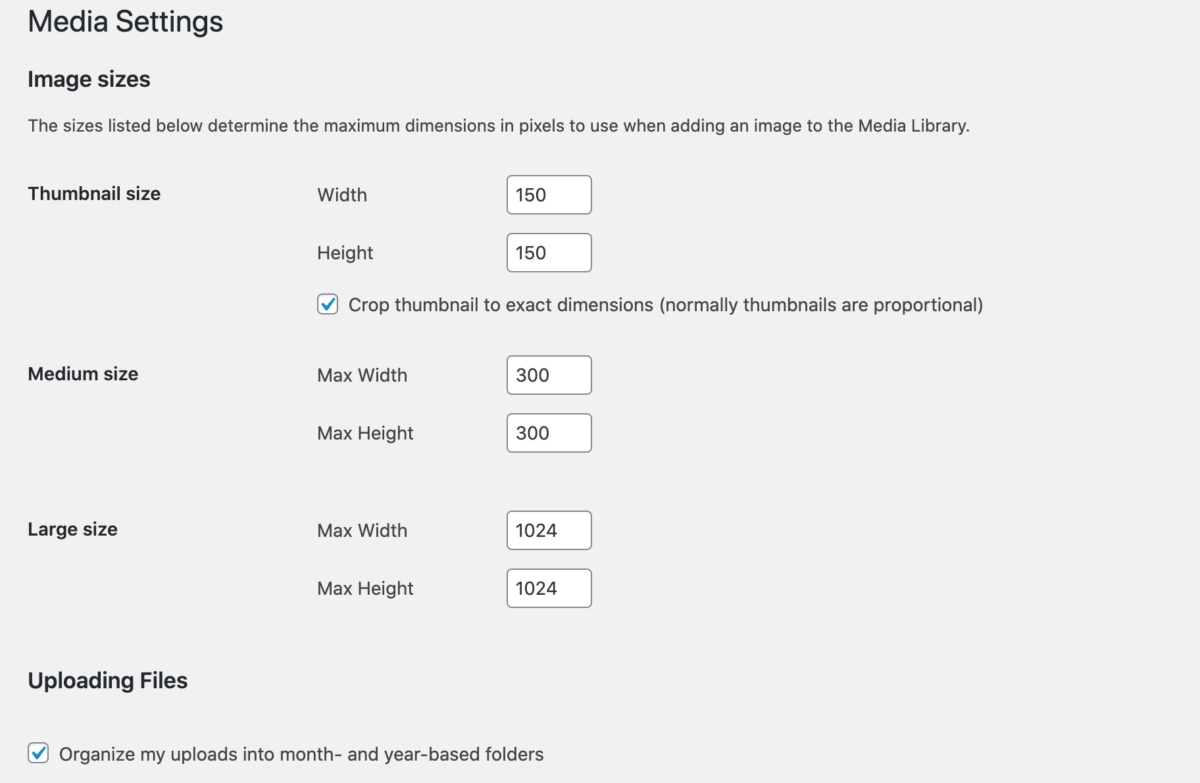
Nowadays, website speed is becoming more and more critical to ensure a great user experience. What would you do if you land on a website that takes more than 5 seconds to load? You’d probably leave and never come back. Don’t let that happen to your website…
One of the main performance hogs for website speed are images. So, if you plan on having lots of images and videos on your website, heed my advice and zero out the default settings above. Don’t worry, nothing will happen, except that your website speed will get better.
Also, I’d recommend you uncheck the checkbox under Uploading Files. If the checkbox is selected, when you upload your media, the files are categorized in folders based on the month and year of the upload. If you uncheck it, the files are uploaded into one folder. The result? You get faster search when you look for any of your media in the media library.
Of course, you can experiment and let me know which you prefer in the comments below. For more information on optimizing your site, read How To Optimize Images Without Losing Their Quality.
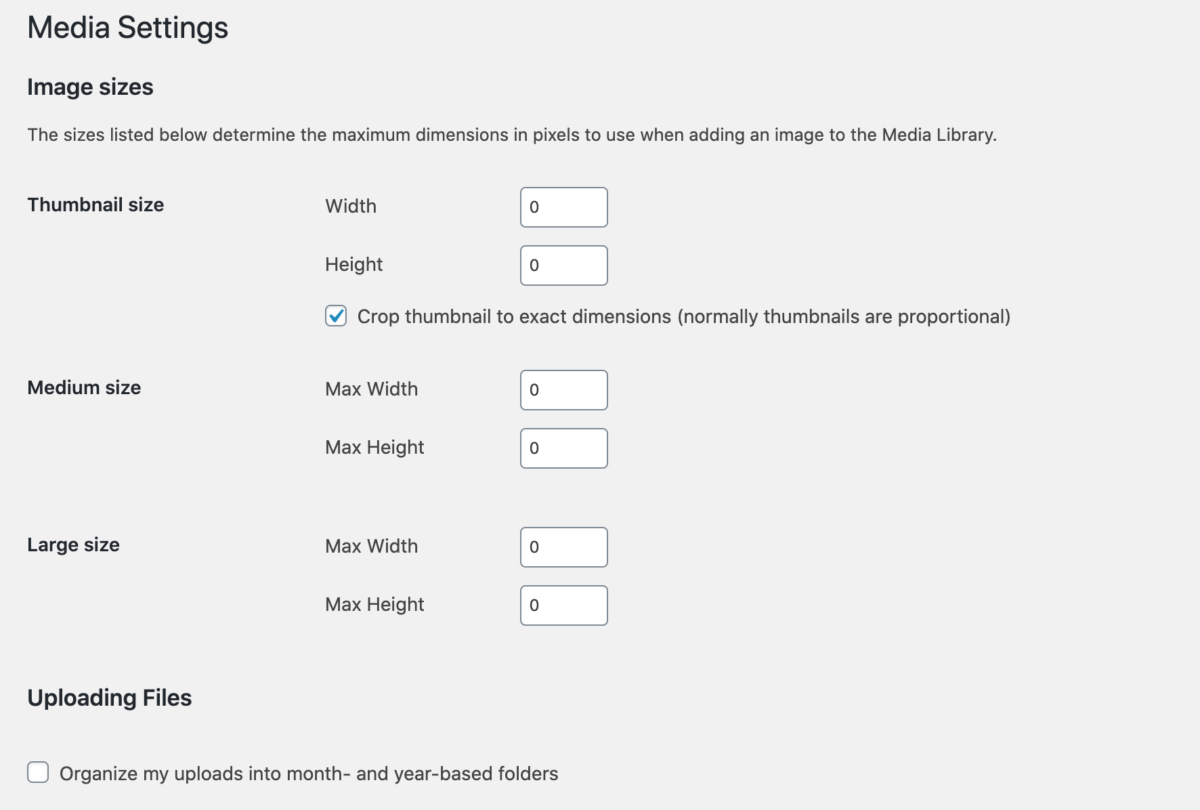
Recommended Media Settings
Here are my current settings for this website:
Permalink Settings
This is another section that you would need to setup prior to publishing your first blog post.
The permalink is basically how your blog post gets its URL address. I would recommend this to be set as post name, as shown below. This way, when you create a new post, you will define the “slug”, which is an abbreviated description of your post, separated by dashes.
For example, I have defined the slug for this post as “wordpress-dashboard-guide”, so the URL of this post will become “https://blogandgetpaid.com/wordpress-dashboard-guide”. Had I left the permalinks to the default settings, which were “Simple”, the URL would have been “https://blogandgetpaid.com/post41” which doesn’t mean anything.
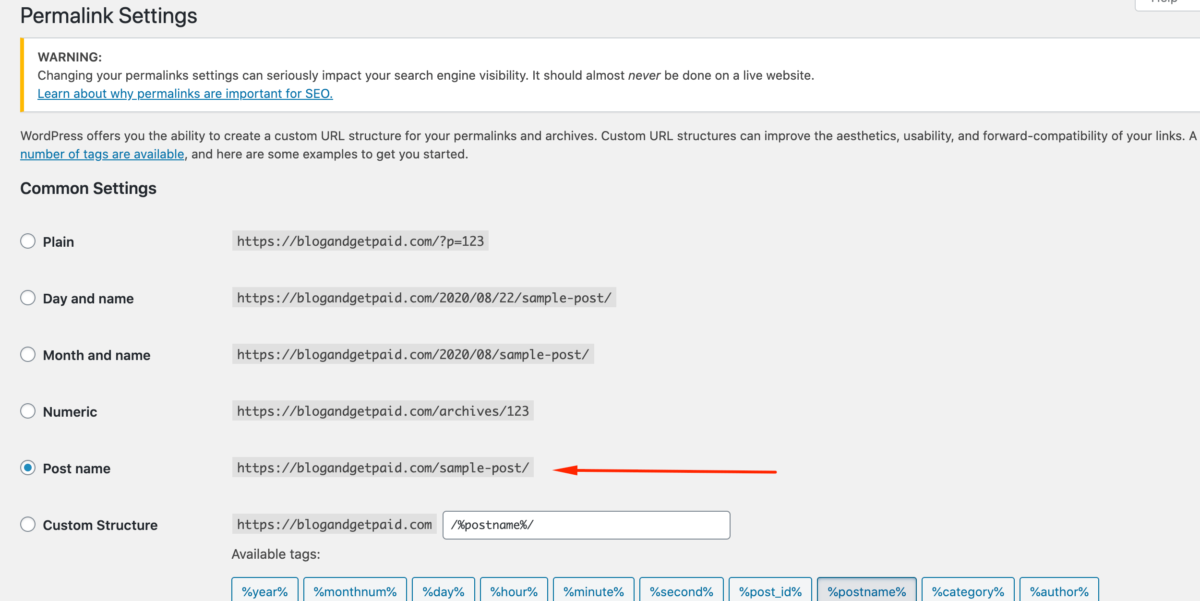
The warning above is to prevent you from changing permalinks on a live site. This is the case with my blog, which is live and fully configured.
Privacy Settings
This settings page is to provide your readers with your Privacy Policy links. Most website owners set these through a menu on the site. I have it setup on the footer menu. This is especially important if your main readership is in Europe, or in some states in the US.
The Privacy Policy tells your readers how you plan on using any data they share with you on your website. To be safe, I highly recommend you set this up. Once done, you would need to review and update it periodically.
This section has covered the Settings that need to be setup in your WordPress Dashboard.
What’s That “W” Above The WordPress Dashboard Menu?
At the top left of the Dashboard screen, there’s the WordPress logo. If you click on it, a small menu appears as follows:
Clicking on the WordPress Logo (W), will open a small menu to learn about WordPress, and to link to the WordPress.org blog for more documentation and support.
To the right of the logo, you’ll see a house icon with your website name next to it.
If you click on About WordPress, the latest news on WordPress are displayed. Your screen may look like this:
Since WordPress 5.5 was just released, WordPress has information on it on their site.
On the same level as the website name, you will see a tally of the number of unread comments received. To its right, there’s a plus icon with a label “New”. Clicking that will reveal a quick access menu to create a new post, add new media, create a new page or a new user.
The four other menu items are a result of the plugins I have activated on my site. You may have different menu items.
At the far right, you will see a greeting from WordPress to the logged in user (Administrator), with the profile picture, which is usually picked up from Gravatar.
Conclusion
By now, you know how to setup the basic settings to get your website up and running. You have a good understanding of the standard WordPress menus and submenus. You are now well on your way to create your first blog post. To do so, please read the following posts:
- 5 Simple Ways To Create An Awesome Blog Post
- Stunning Image Sites That Make Blogs Stand Out
- Top 10 Amazing WordPress Plugins For Your New Blog
- From Zero To Blog In 5 Steps
If you’ve made it all the way here, I thank and congratulate you. I hope you have derived value out of this blog post. You should know now how to optimize your WordPress Dashboard settings to get the most out of your website.
If you have any questions, not covered here, please leave me a comment and I’ll be happy to guide you. I’d appreciate it if you would share my post within your social network.
Featured Image by Rawpixel.
Hey Pinterest fans, please pin the images below to your favorite boards!
I design my Pinterest pins using Canva. You can use it to get your social media graphics done in no time! Check out the banner on the right sidebar.

Wow – this is what I call a thorough guide. I’ve setup my blog about two weeks ago and have been clicking around the admin area without understanding what I was doing. I’m not getting anywhere.
How do you know which plugins to install? How can you tell which theme is best for you?
Hey Jenny – thanks for stopping by and making it to the end!
When you start out blogging, it’s always good advice to brainstorm on why you’re blogging and what you want out of it. If you want to become a lifestyle or fashion blogger, for example, there are different themes that cater to that. Alternately, if you want to setup an online store, you may want a different theme altogether. Thankfully, WordPress comes with over 5000 free themes that you can choose from. To help you choose, be sure to read my post on “From Zero To Theme In 30 Minutes”, which tells you exactly how to use the filter to get to which themes would apply to you.
Also read my Plugins post which gives you an idea of which plugins I use. To start, I’d recommend Akismet, Yoast SEO, Updraft, WP Rocket, Real SSL, Optimole and Social Warfare – all these are plugins I use and have found great on my site.
Wow this is very helpful blog, thank you so much for sharing ?
Thanks for leaving your comments, Sri. Glad you found the post valuable.
Hi Nadim. Great post on WordPress. As you say, far too many guides stop at ‘Install WordPress’ and don’t actually give any more guidance after that. And it’s nice to see somebody else that ‘goes the extra mile’ and creates detailed, informative posts. Good job 🙂
Hi Richie,
Thank you so much for your kind words. I’m glad I could provide you a post with value.
Wow very thorough guide. I didn’t know you could customize what you see in the dashboard. Thanks for this. Bookmarking now.
Hey Clarissa,
Thanks for your feedback! I’ll share a secret, I didn’t know either! I discovered it as I was doing the guide, writing this post 🙂 – you live and you learn!
I’m happy you’re bookmarking the post!
This is so thorough and so helpful for those starting out and needing some guidance. Thanks for sharing!
Thanks for your feedback, Alex.